Contributing
This guide shall help you in setting up your build & test environment, so that you can start developing and testing bug fixes and feature enhancements without having to make too much effort in setting up a local toolchain.
Before You Start
The Gateway Plugin for Argo Rollouts is written in Golang. If you do not have a good grounding in Go, try out the tutorial.
Pre-requisites
Install on your local workstation:
Checkout the code:
git clone https://github.com/argoproj-labs/rollouts-plugin-trafficrouter-gatewayapi.git
cd rollouts-plugin-trafficrouter-gatewayapi
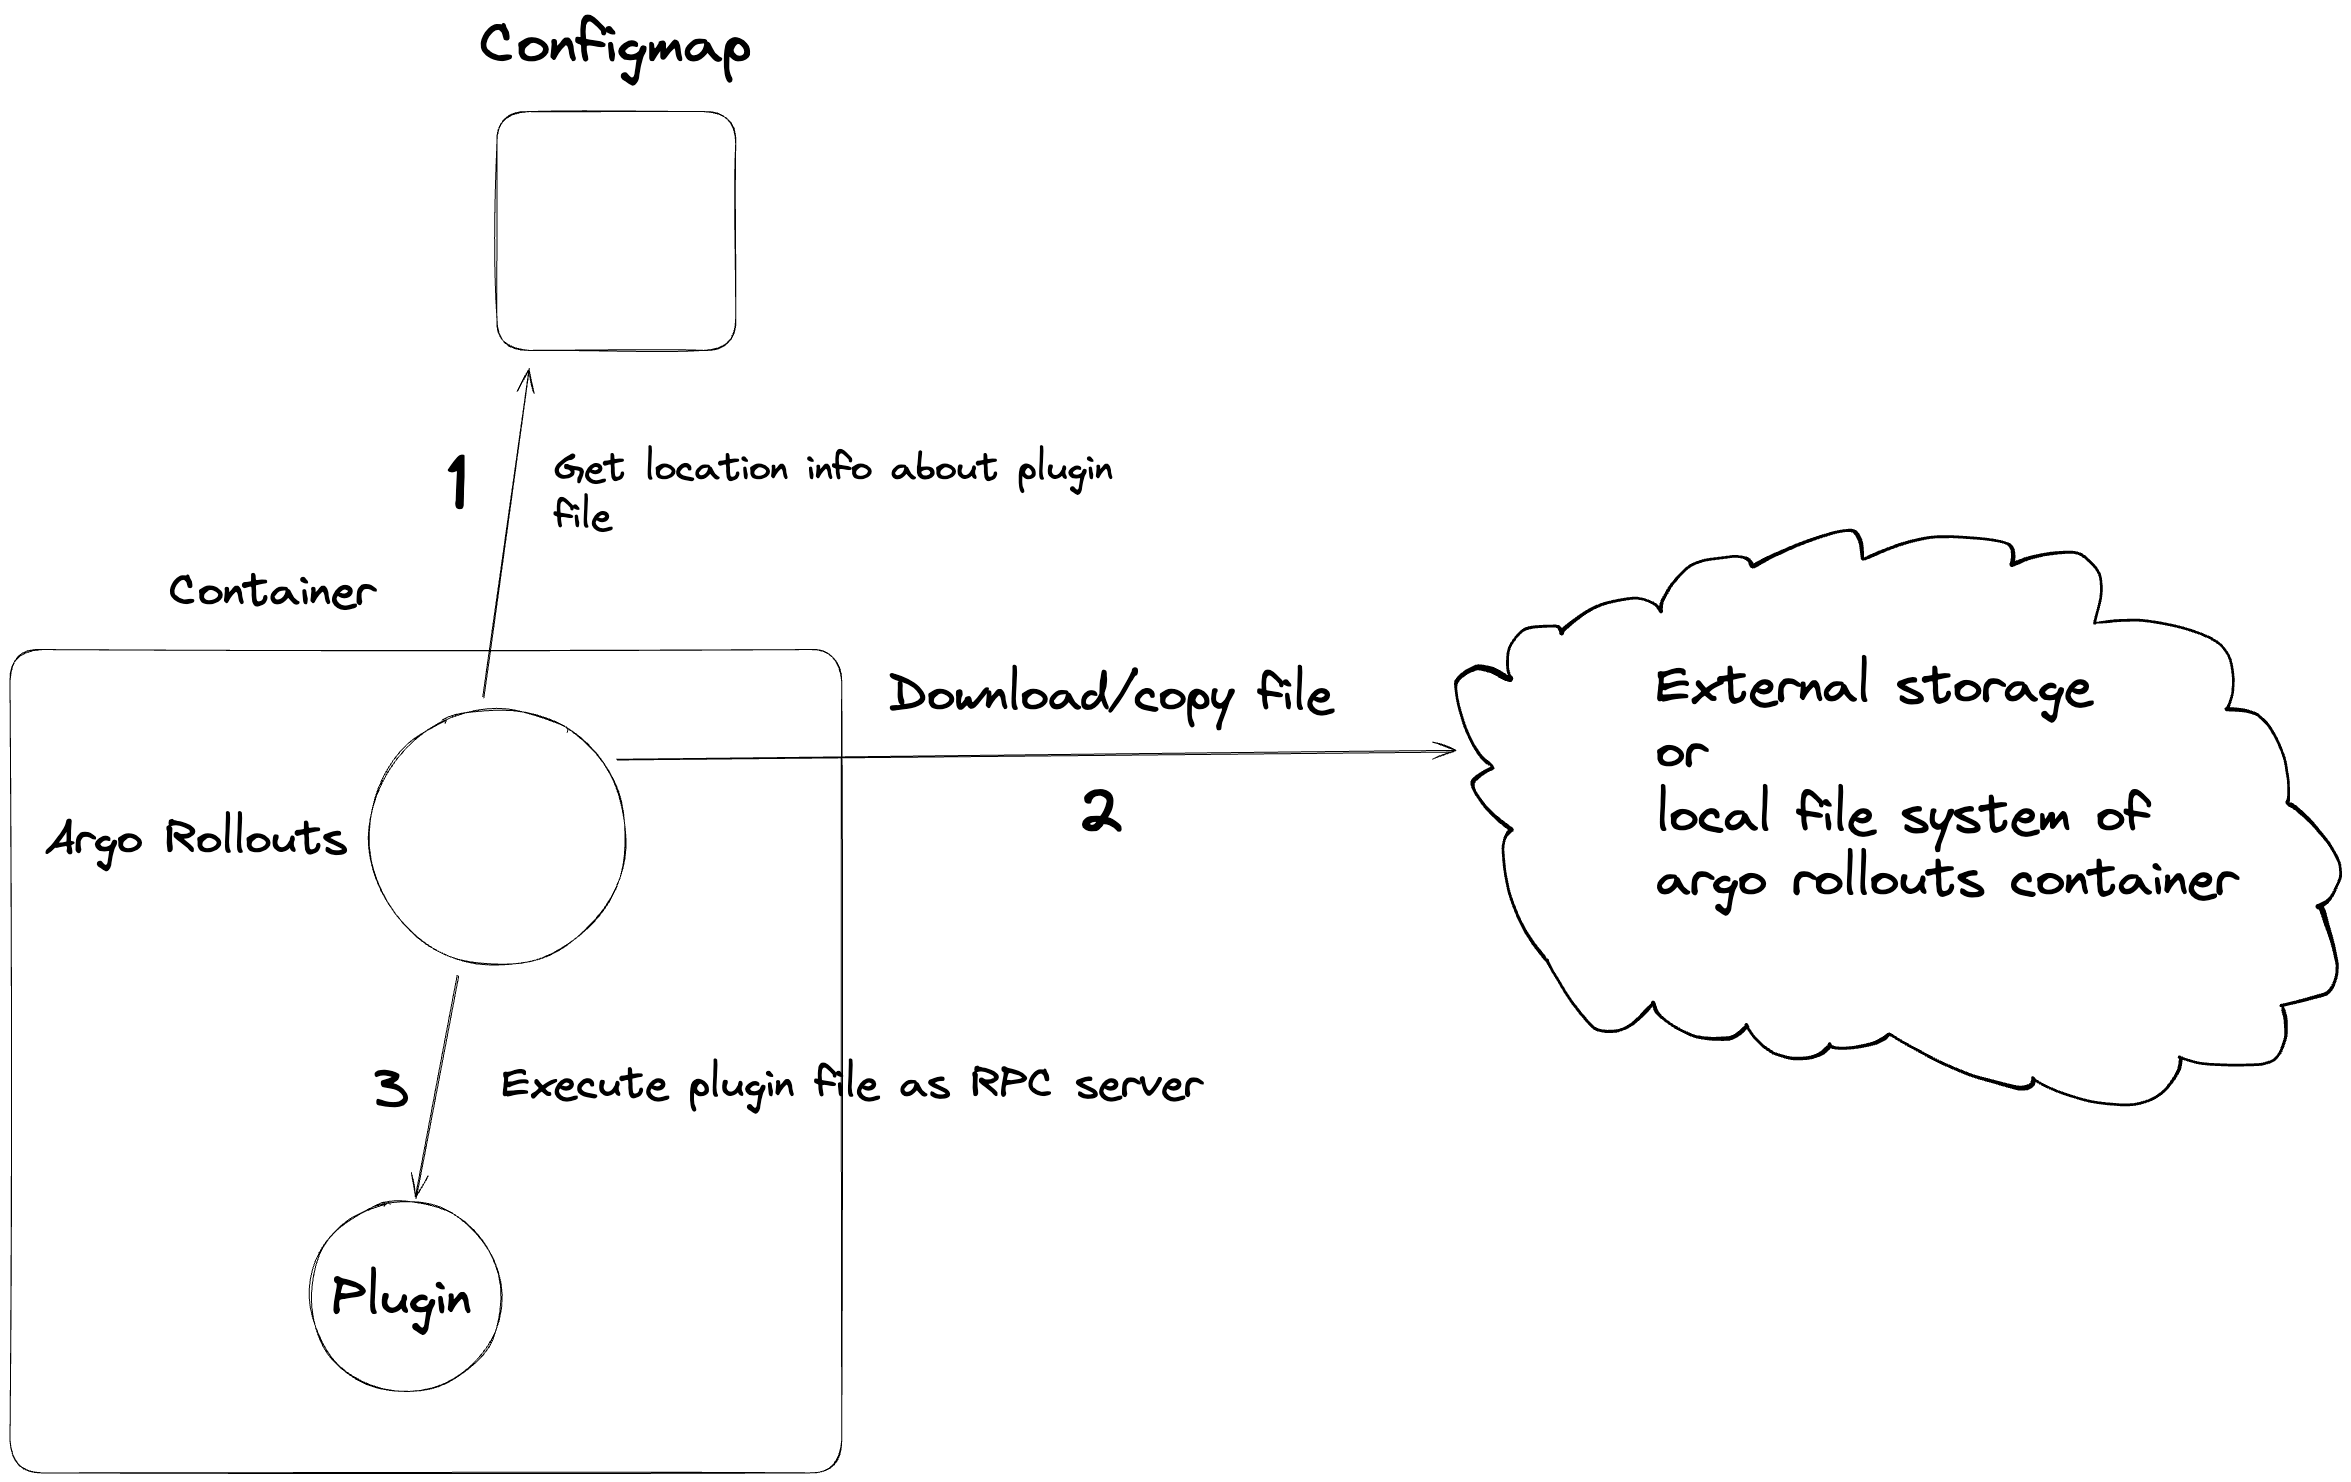
Argo Rollouts plugin system architecture
The Argo Rollouts Gateway API plugin needs the main Argo Rollouts controller to work.
When the Argo Rollouts controller starts, it reads the ConfigMap named argo-rollouts-config (from the namespace in which controller is located) from the API server of the k8s cluster it is running on.
If this configmap is present, the Argo Rollouts controller validates its content and then loads the plugin that is defined there. It is important to understand that this process happens only at the beginning and only once during the controller startup.
This means that if you change the argo-rollouts-config configmap or if you create it after the Argo Rollouts controller is already up, you will need to restart the controller for the changes to take effect.
The Argo Rollouts Controller uses this config map to understand where to load its plugins from. When Argo Rollouts learns their locations, it downloads and executes them as separate RPC servers in the same pod. When the controller detects specific Rollout events, for example events corresponding to the SetWeight action, it makes specific remote procedure calls to the respective RPC server and waits for a response.
Here is a diagram illustrating the main aspects of architecture:
For more information about Argo Rollouts plugins please read
- https://argo-rollouts.readthedocs.io/en/latest/plugins/
- https://argo-rollouts.readthedocs.io/en/latest/features/traffic-management/plugins/
Project dependencies
The project is using Go modules.
See all dependencies in the go.mod file. The usual go build/test commands will automatically install the needed dependencies in your local workspace.
Building the plugin
We have 2 targets in the Makefile:
local-build- This is the main makefile target you will use during development. This creates raw/unoptimized binaries that keep the link symbols so that you can use a Go debugger while you change your code.gateway-api-plugin-build- This makefile target creates an optimized build binary for a production release. This target is currently run by Continuous integration to create releases. You should normally not need this target during development
Running the plugin Locally
To start developing the plugin do the following
- Start your local Kubernetes cluster
- Create a ConfigMap named
argo-rollouts-configin the namespace of the Argo Rollouts controller. We will run it locally so its namespace will bedefault - Run
make local-buildto create a local build of the plugin binary. In theargo-rollouts-configmanifest specify the path to this local build by using a file directivefile://<path to the local build> - Install required CRDs for Argo Rollouts and deploy the controller. For that you can run
After that, delete the in-cluster Argo Rollouts controller deployment as we will run controller locally (We only needed the CRDs).
kubectl create namespace argo-rollouts kubectl apply -n argo-rollouts -f https://github.com/argoproj/argo-rollouts/releases/latest/download/install.yaml - Run locally the Argo Rollouts controller
cd ~/go/src/github.com/argoproj/argo-rollouts go run ./cmd/rollouts-controller/main.go - If you followed all instructions correctly, the Argo Rollouts controller will find your local build of your plugin and will run it as an RPC server locally. You have the ability to debug the plugin like any other Golang application. Any Goland Debugger that has the ability to attach to a local process can be used to place breakpoints on your code.
Running Unit Tests
To run unit tests:
make unit-tests
Running E2E tests
The e2e tests need to run against a kubernetes cluster with the Argo Rollouts controller. To run e2e tests run in the repository root
make e2e-tests
This command will
- Create a local cluster gatewayapi-plugin-e2e using tools kind and docker. You need to install them.
- Set up the cluster using tools helm and kubectl. You need to install them.
- Run tests in the /test/e2e folder.
- Delete all resources from the created cluster.
- Delete the created cluster.
Note: Traefik is used in e2e tests.
If you want to leave the working cluster with the needed setup at the end, you should run the following command
make CLUSTER_DELETE=false e2e-tests
After this command, you may want to run all tests again. Although you can run the make CLUSTER_DELETE=false e2e-tests command again, it is recommended to use this command
make run-e2e-tests
If you want to run specific e2e tests, then you can use these commands
make RUN=<reg-exp> e2e-tests
make RUN=<reg-exp> run-e2e-tests
Cleaning up after failed E2E tests
If your E2E tests fail, then the kind cluster will stay behind.
If you want to delete it (after debugging it) run:
make clear-e2e-cluster
Upgrading the versions for E2E components
You can see which versions are used for Argo Rollouts, Traefik and Gateway API specification near the top of the Makefile.
Creating a Pull Request
When you have finished implementing your feature, you need to create a Pull Request in GitHub.
You need to sign-off your commit using DCO (Developer Certificate of Origin). Read the guide if you don't know how to do that.
Please use meaningful PR names for the Pull request title.
When you submit a PR, a couple of CI checks will be run automatically to ensure your changes will build fine and meet certain quality standards. Your contribution needs to pass those checks in order to be merged into the repository.
Documentation Changes
Install Docker locally.
Modify documentation contents in the docs/ directory.
You can preview changes in your browser by visiting http://localhost:8000 after running:
make serve-docs
Making GitHub releases
- Write the description of the future release in /RELEASE_NOTES.md
- Create a tag in the
mainbranchIf you prefer to make pre-release rungit tag release-v[0-9]+.[0-9]+.[0-9]+git tag release-v[0-9]+.[0-9]+.[0-9]+-rc[0-9]+ - Push the tag to the remote repository
- The pushed tag will trigger a GitHub Actions workflow that will create a corresponding tag
v[0-9]+.[0-9]+.[0-9]+orv[0-9]+.[0-9]+.[0-9]+-rc[0-9]+and will then delete your tag. Therefore, after pushing the tag to the remote repository, you also need to delete it locally. When the workflow has finished its work, you can run git pull and you will see the new tag.